
I've been googling this for over an hour, and this is the magic
bullet, the solution to an apparent defect that plagues many
X3 vehicles -- an annoying rattle in the doors while driving.
http://www.bmwtis.com/tsb/bulletins/bulletin_graphic_temp/B512805g.htm
Tell the dealer to look up Service Bulletin: SIB 51 28 05.
SI B 51 28 05
Body Equipment
February 2007
Technical Service
This Service Information bulletin supersedes S.I. B51 28 05 dated December 2006.
SUBJECT
Window Guide Noise
MODEL
E83 (X3)
SITUATION
Some customers may complain of hearing squeaking or creaking noises coming from the door frame area when driving on rough roads.
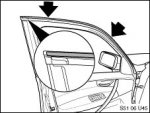
CAUSE
Movement between the flocking material (felt-like material indicated by the arrows) on the window guide and the surrounding roof panel may produce squeaking or creaking noises.
These noises may be amplified by contamination or cleaner residue on the door opening.
[See Attached Image: S5106U45]
CORRECTION
In case of a customer complaint, refer to the procedure outlined below to replace the seals with improved parts and/or apply the specified transparent Teflon tape.
The flocking material was changed from Poly Amid (PA) to Poly Ethylene Terephthalate (PET) in June 2005. PET is a thermoplastic polyester with a semi-crystalline structure that has exceptional rigidity, strength, dimensional stability and low moisture absorption.
The new and improved parts may not have any unique identifying stamps, therefore the production date should be used to identify the new guides.
Updated guides will have a date stamp on the back of the part reading later than June 13, 2005 (13.6.2005).
PROCEDURE
Depending on the status of the vehicle, perform the applicable procedure described below.
A. Vehicles produced up to 01/2005, first complaint:
* Replace all 4 upper door seals with the improved parts.
o Follow Repair Instruction RA 51 32 211 to replace the front window guides.
o Follow Repair Instruction RA 51 34 211 to replace the rear window guides.
* Thoroughly clean the upper door seal's mating surface on the body of the vehicle with a silicone remover such as 3M General Purpose Adhesive Cleaner or Wurth Silicone Remover.
* Do not apply "Carbaflo" on these door seals.
B. Vehicles produced from 01/2005, and vehicles that have previously had the improved seals installed.
* Thoroughly clean the upper door seal's flocking material, as well as the mating surface on the body of the vehicle with a silicone remover such as 3M General Purpose Adhesive Cleaner or Wurth Silicone Remover.
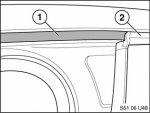
* Apply a continuous length of Teflon tape (PN 9 407 798) to the entire contact area on the body of the vehicle, from the middle of the a-pillar to the top of the c-pillar.
[See Attached Image: S5106U48]
Notes:
The tape should be applied slowly and very carefully to avoid trapping air bubbles under the tape.
To eliminate visibility of the tape when the door is closed and ensure proper contact with the flocking surface, the upper edge of the tape (1) should line up evenly with the top of the door seal (2) for the entire length of the applied area.
The tape should be applied in its full width (16mm), not be cut down to a narrower width.
C. Vehicles produced up to 01/2005, which are in for a repeat complaint, and still have the original seals installed
* Replace all 4 upper door seals as per procedure A.
* Apply Teflon tape as per procedure B.
PARTS INFORMATION
Part Number / Description / Quantity
51 33 3 424 493 / Window guide seal, front left / 1
51 33 3 424 494 / Window guide seal, front right / 1
51 35 3 424 495 / Window guide seal, rear left / 1
51 35 3 424 496 / Window guide seal, rear right / 1
83 19 9 407 798 / Teflon adhesive tape / 1
3M General Purpose Adhesive Cleaner may be used for this procedure.
For more information on this product, please visit www.3M.com.
Wurth Silicone Remover may also be used for this procedure.
For more information on this product, please visit www.wurthusa.com.
WARRANTY INFORMATION
Covered under the terms of the BMW New Vehicle Limited Warranty.
bullet, the solution to an apparent defect that plagues many
X3 vehicles -- an annoying rattle in the doors while driving.
http://www.bmwtis.com/tsb/bulletins/bulletin_graphic_temp/B512805g.htm
Tell the dealer to look up Service Bulletin: SIB 51 28 05.
SI B 51 28 05
Body Equipment
February 2007
Technical Service
This Service Information bulletin supersedes S.I. B51 28 05 dated December 2006.
SUBJECT
Window Guide Noise
MODEL
E83 (X3)
SITUATION
Some customers may complain of hearing squeaking or creaking noises coming from the door frame area when driving on rough roads.
CAUSE
Movement between the flocking material (felt-like material indicated by the arrows) on the window guide and the surrounding roof panel may produce squeaking or creaking noises.
These noises may be amplified by contamination or cleaner residue on the door opening.
[See Attached Image: S5106U45]
CORRECTION
In case of a customer complaint, refer to the procedure outlined below to replace the seals with improved parts and/or apply the specified transparent Teflon tape.
The flocking material was changed from Poly Amid (PA) to Poly Ethylene Terephthalate (PET) in June 2005. PET is a thermoplastic polyester with a semi-crystalline structure that has exceptional rigidity, strength, dimensional stability and low moisture absorption.
The new and improved parts may not have any unique identifying stamps, therefore the production date should be used to identify the new guides.
Updated guides will have a date stamp on the back of the part reading later than June 13, 2005 (13.6.2005).
PROCEDURE
Depending on the status of the vehicle, perform the applicable procedure described below.
A. Vehicles produced up to 01/2005, first complaint:
* Replace all 4 upper door seals with the improved parts.
o Follow Repair Instruction RA 51 32 211 to replace the front window guides.
o Follow Repair Instruction RA 51 34 211 to replace the rear window guides.
* Thoroughly clean the upper door seal's mating surface on the body of the vehicle with a silicone remover such as 3M General Purpose Adhesive Cleaner or Wurth Silicone Remover.
* Do not apply "Carbaflo" on these door seals.
B. Vehicles produced from 01/2005, and vehicles that have previously had the improved seals installed.
* Thoroughly clean the upper door seal's flocking material, as well as the mating surface on the body of the vehicle with a silicone remover such as 3M General Purpose Adhesive Cleaner or Wurth Silicone Remover.
* Apply a continuous length of Teflon tape (PN 9 407 798) to the entire contact area on the body of the vehicle, from the middle of the a-pillar to the top of the c-pillar.
[See Attached Image: S5106U48]
Notes:
The tape should be applied slowly and very carefully to avoid trapping air bubbles under the tape.
To eliminate visibility of the tape when the door is closed and ensure proper contact with the flocking surface, the upper edge of the tape (1) should line up evenly with the top of the door seal (2) for the entire length of the applied area.
The tape should be applied in its full width (16mm), not be cut down to a narrower width.
C. Vehicles produced up to 01/2005, which are in for a repeat complaint, and still have the original seals installed
* Replace all 4 upper door seals as per procedure A.
* Apply Teflon tape as per procedure B.
PARTS INFORMATION
Part Number / Description / Quantity
51 33 3 424 493 / Window guide seal, front left / 1
51 33 3 424 494 / Window guide seal, front right / 1
51 35 3 424 495 / Window guide seal, rear left / 1
51 35 3 424 496 / Window guide seal, rear right / 1
83 19 9 407 798 / Teflon adhesive tape / 1
3M General Purpose Adhesive Cleaner may be used for this procedure.
For more information on this product, please visit www.3M.com.
Wurth Silicone Remover may also be used for this procedure.
For more information on this product, please visit www.wurthusa.com.
WARRANTY INFORMATION
Covered under the terms of the BMW New Vehicle Limited Warranty.
Attachments
-
 18.3 KB Views: 45
 -
 32.5 KB Views: 44
